All Projects
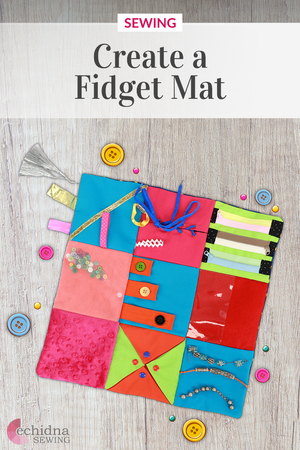


Fidget Mat
Fidget mats provide gentle sensory stimultation with different fabrics, textures, colours and objects attached. They are wonderful for kids, or those with restless hands like dementia and Alzheimer patients. They are a great calming tool and give the user a relaxing tactile experience.
Our Fidget Mat tutorial is great for those that are at an intermediate to advanced level of sewing.
Finished size: 18" x 18"
Please note: The following materials are what we used to make our fidget mat. We encourage you to use your own stash of fabric and accessories if you wish.
Fabric Requirements
- 7 x Plain fabric (varied colours) background squares - (6½" x 6½")
- 6 x Additional plain fabric squares (varied colours) - (6½" x 6½")
- 1 x Minky square (6½" x 6½")
- 25" strip of 1" bias tape
- 6 x Zipper tabs (1½" x 1¾")
- 1 x Clear vinyl piece (3 ¼" x 6½")
- 1 x Felt piece (6½" x 6½")
- 3 x Squares of white tulle (6¾" x 6¾")
- Backing fabric 18.5" x 18.5" (we used Flannelette)
Stabilizers
- 9 x Medium Cutaway (6½" x 6½")
- 9 x Fusible See-Through Cutaway (6½" x 6½")
Tools
- Pins or small Echidna Clips
- Needle and thread
- Rasant thread
Accessories
- 3 x 5" zips
- Snaps or Press Studs
- Variety of beads
- Assorted buttons
- Cord
- Assorted ribbons - different textures (eg. Ric Rac, Satin, Organza)
- Shoelace
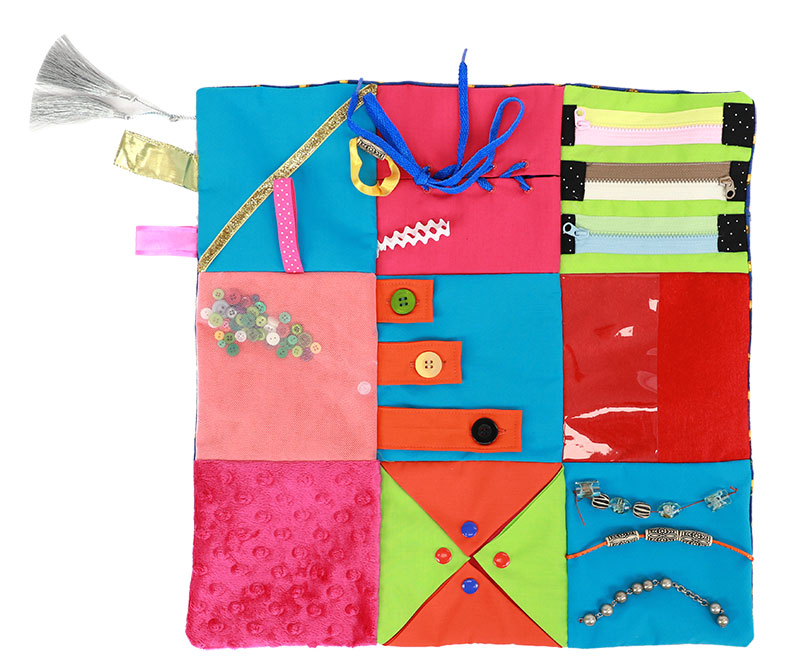
Click on the image of each square below to view instructions.
Project Steps
Fabric preparation for the 9 x background squares
- Iron the Fusible See-Through Cutaway onto the back of your 7 x plain background squares and your minky and felt squares
- Then, place a piece of medium Cutaway underneath each of these squares, backing onto the See-Through Cutaway
Sewing tips
- Use a ⅛" seam when attaching the fabric to the stabilizer
- Use a ¼" foot F057 and seam when piecing the squares
- When using a variety of colours in a project, a grey thread blends well with most colours. We have used Rasant thread Grey 0191
- Lengthen stitch length from 2.5 to 3 if the fabric is difficult to feed
- Stitch vinyl with a Roller Foot F006 or Teflon Foot F007N
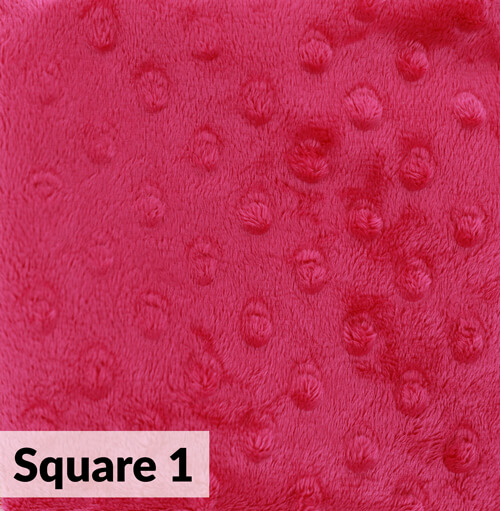
Square 1: Minky
- Pin the Cutaway stabilizer to the back of the Minky square.
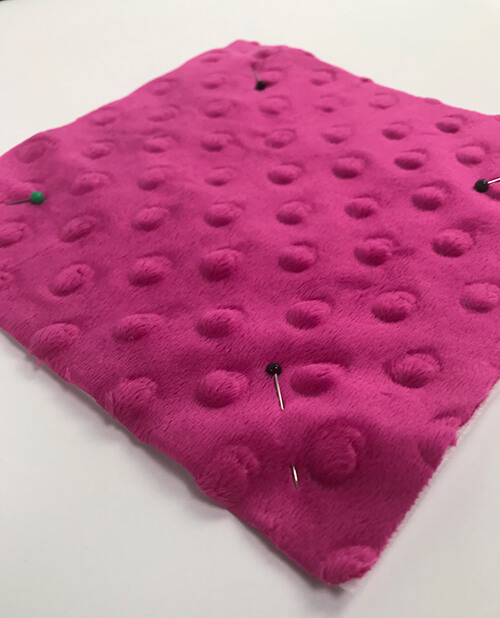
- Using Rasant thread, a ⅛" seam and a Teflon foot, sew around the outside of the square securing the Minky fabric to the stabilizer.
- Set aside until the remaining squares are completed.
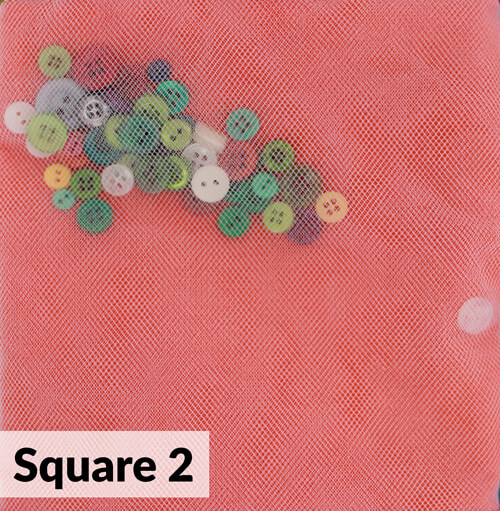
Square 2: Tulle & Buttons
- Place 3 layers of tulle on top of a background square, keeping the edges of the tulle square with the background fabric. Using Echidna clips or pins, clip the tulle to the background fabric and Cutaway, leaving a gap along one side to insert buttons.
- Using Rasant thread, a ⅛" seam and a regular foot, sew around the outside of the square securing the layers to the stabilizer - leaving a gap open to insert buttons.
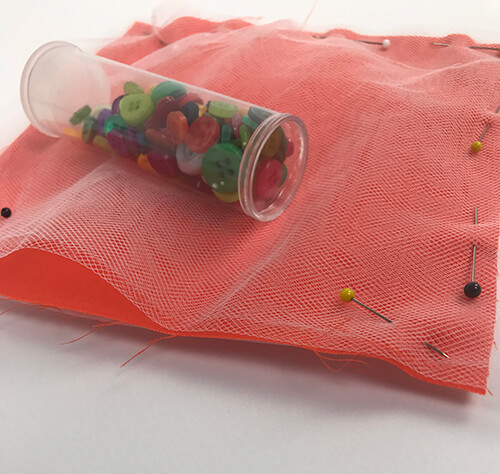
- Pour a handful of buttons between the tulle layers and the background fabric.
- Stitch the gap closed making sure not to catch any buttons.
- Set aside until the remaining squares are completed.
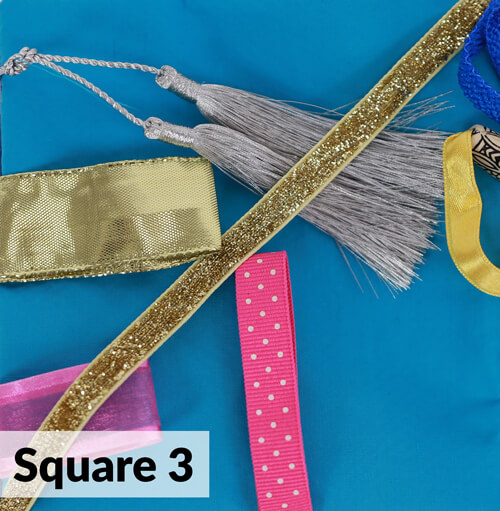
Square 3: Ribbons, Braids and Tassels
- Pin another background square to the Cutaway stabilizer placed underneath.
- Measure up different sizes of the variety of selected ribbons, and pin to the square. We have used 5", 6" and 9" pieces. Trim the ribbon so they are flush with the outside edge of the background square.
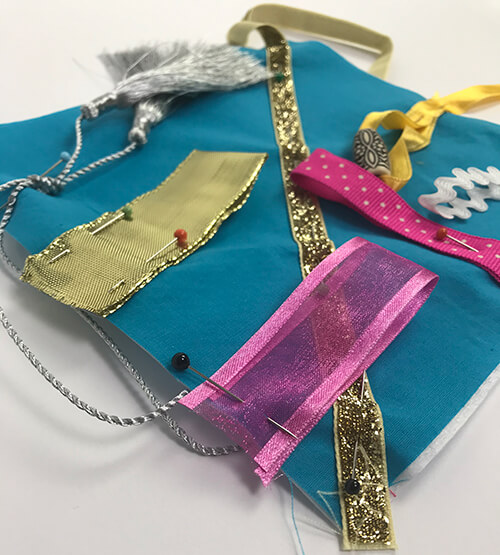
- Using Rasant thread, a ⅛" seam and a regular foot, sew around the outside of the square securing the fabric to the stabilizer.
- Set aside until the remaining squares are completed.
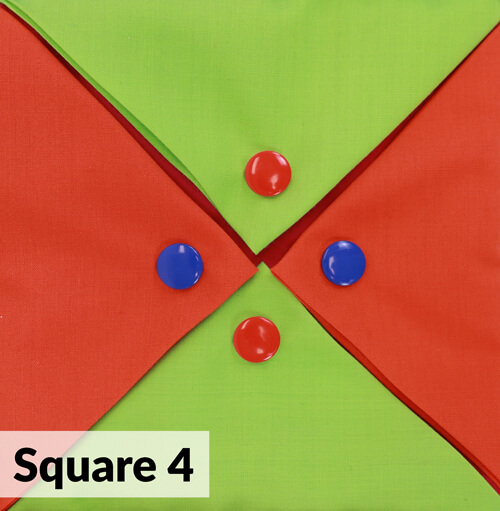
Square 4: Triangles with snaps
- Pin another background square to the Cutaway stabilizer placed underneath.
- Using Rasant thread, a ⅛" seam and a regular foot, sew around the outside of the square securing the fabric to the stabilizer.
- Select 4 of the additional plain fabric squares in two different colours. Fold in half on the diagonal and press, fold again to create a small triangle and press. Repeat with the remaining 3 fabrics.
- Place and pin the 4 fabric triangles on the background fabric with the points facing the centre of the square. Using Rasant thread, a ⅛" seam and a regular foot, sew around the outside of the square securing the fabric triangles to the stabilizer.
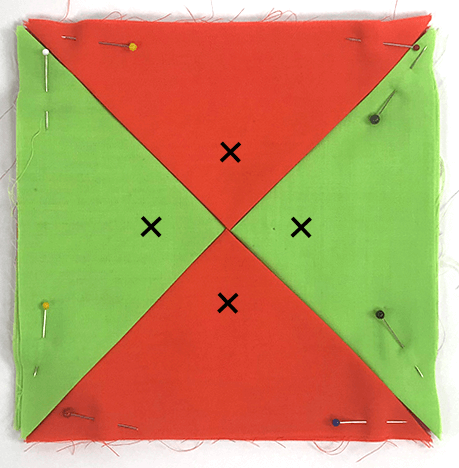
- Mark the position of the snaps near the triangle points and attach. Mark the base of the snaps on the background fabric underneath the top snap, attach.
- Set aside until the remaining squares are completed.
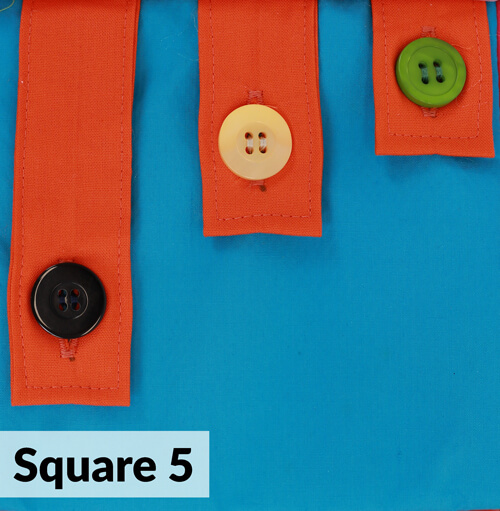
Square 5: Buttons and buttonholes
Quick tip: Check out our video on how to use a Button Sewing Foot (M foot) to attach your buttons →
- Pin another background square to the Cutaway stabilizer placed underneath.
- Using Rasant thread, a ⅛" seam and a regular foot, sew around the outside of the square securing the fabric to the stabilizer.
- Using the bias tape, cut the following lengths: 1" x 4.5", 1" x 6" and 1" x 10". Fold in half width ways and iron. Stitch around each piece.
- Mark the start point for the buttonhole. We have measured ½" up from the folded edge. Stitch the buttonhole then cut through the centre of the stitched buttonhole, repeat for all pieces.
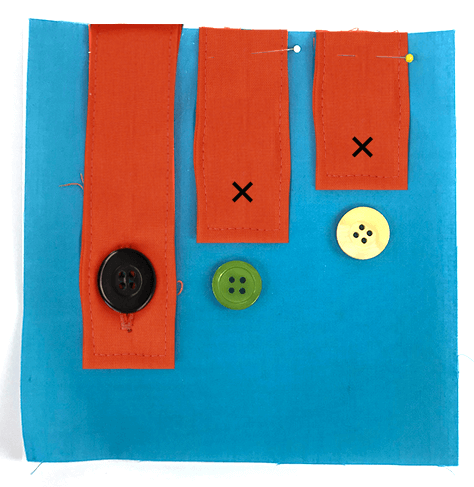
- Place the 3 strips onto the fabric square with raw edges aligned. Using Rasant thread, a ⅛" seam and a regular foot, sew across the top of the square and over the strips securing them in place.
- Mark the button placement on the background square, and stitch in place with your sewing machine or by hand.
- Set aside until the remaining squares are completed.
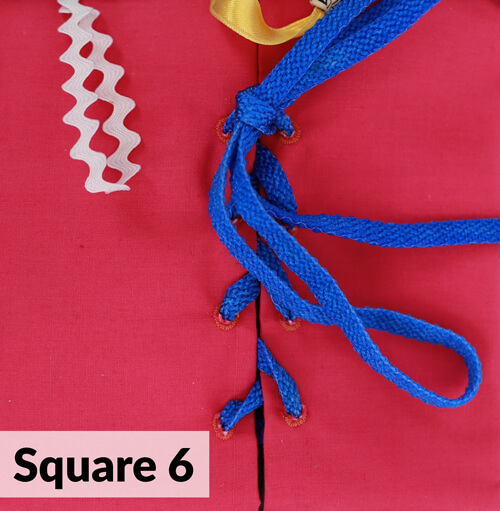
Square 6: Lacing
- Pin Cutaway to a plain fabric background square.
- Using Rasant thread, a ⅛" seam and a regular foot, sew around the outside of the square securing the fabric to the stabilizer.
- Pin the shoelace to the centre of the background fabric 1¼" up from an edge. Secure in place.
- Take 2 extra pieces of bright fabric and fold in half, iron.
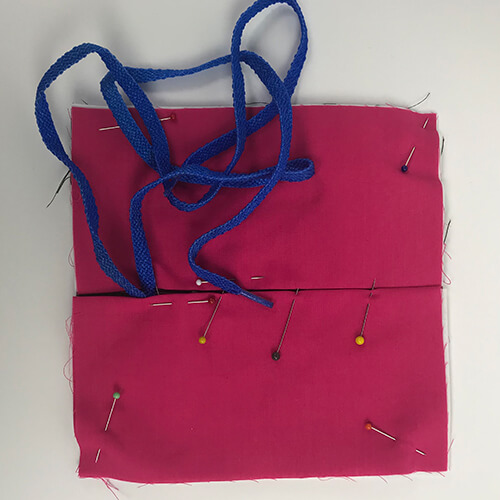
- Cut 2 pieces of medium Cutaway 6½" x 3¼" and place in the middle of the folded fabric.
- We have used the eyelet stitch to create the lacing holes. Measure 1¾" from the top of the fabric and place a dot. In 1" increments, place 4 dots for positioning of the eyelet. Stitch 4 eyelets on the folded side of the fabric and cut open each eyelet for the shoelace to thread through.
- Using Rasant thread, a ⅛" seam and a regular foot, sew around the outside of the square securing the eyelet fabric to the background fabric and stabilizer.
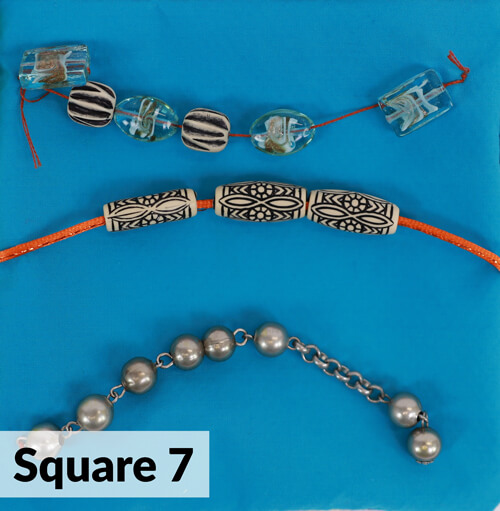
Square 7: Beads
- Pin another background square to the Cutaway stabilizer placed underneath.
- Using Rasant thread, a ⅛" seam and a regular foot, sew around the outside of the square securing the layers to the stabilizer
- String together the assorted beads you have and attach them to the background fabric by hand or machine.
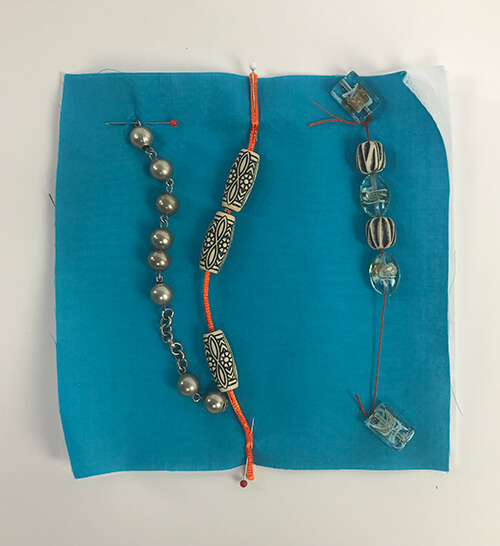
- Set aside until the remaining squares are completed.
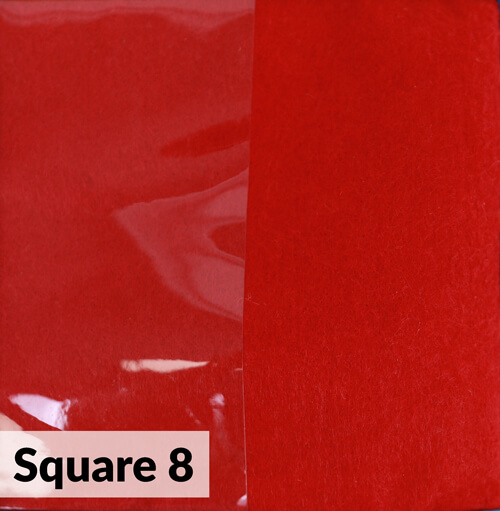
Square 8: Felt & Vinyl
- Place the clear vinyl on top of the felt square. It should cover half of the square.
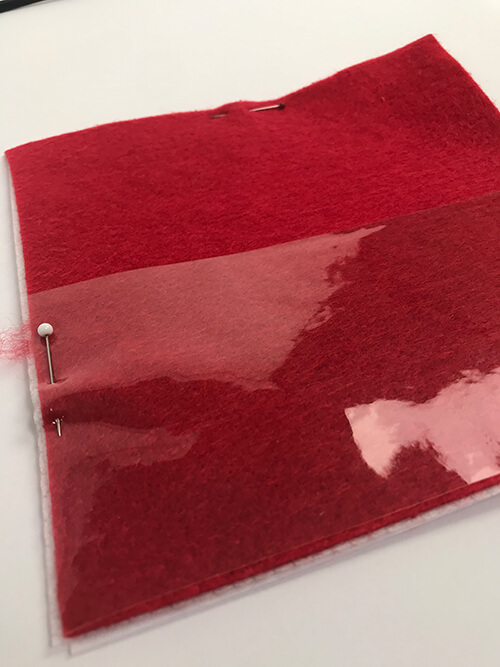
- Using Echidna clips or pins, clip the clear vinyl and felt to the Cutaway stabilizer underneath.
- Using Rasant thread, a ⅛" seam and a Teflon foot, sew around the outside of the square securing the layers to the stabilizer.
- Set aside until the remaining squares are completed.
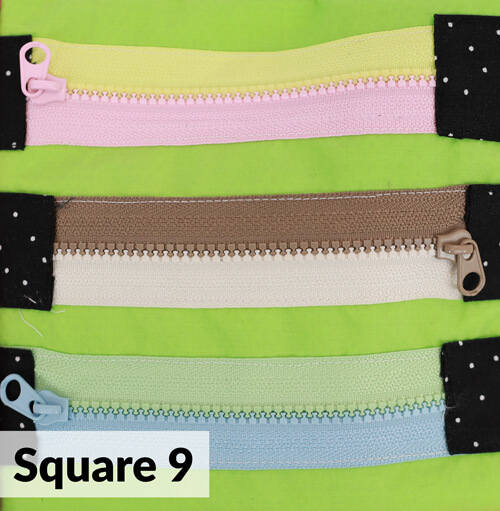
Square 9: Zips
- Pin another background square to the Cutaway stabilizer placed underneath.
- Using Rasant thread, a ⅛" seam and a regular foot, sew around the outside of the square securing the fabric to the stabilizer.
- Place the three zippers in the middle of the square ensuring the zipper pulls are not in the seam allowance. Using a matching thread and a regular foot, stitch the zippers in place on the outside edge of each zipper.
- Cut 6 x zipper tabs measuring 1½" x 1¾". Fold and press to create 6 x squares with the raw edges flush with the outside edges of the background square. Place zipper tabs over the top and bottom of each zip. With matching thread, stitch in place.
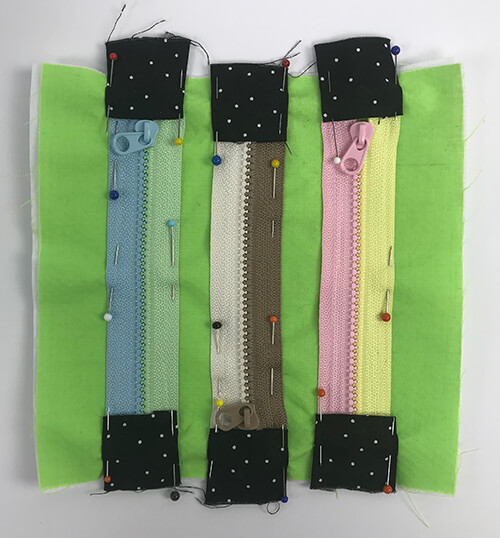
- Set aside until the remaining squares are completed.
Completing the fidget mat
- Square up each block to 6½" x 6½", trimming off the excess stabilizers.
- Place the squares together in rows of 3. Tape the ribbon and lace to the centre of the background to prevent them from getting caught in the seam. Stitch each row together with a ¼" seam.

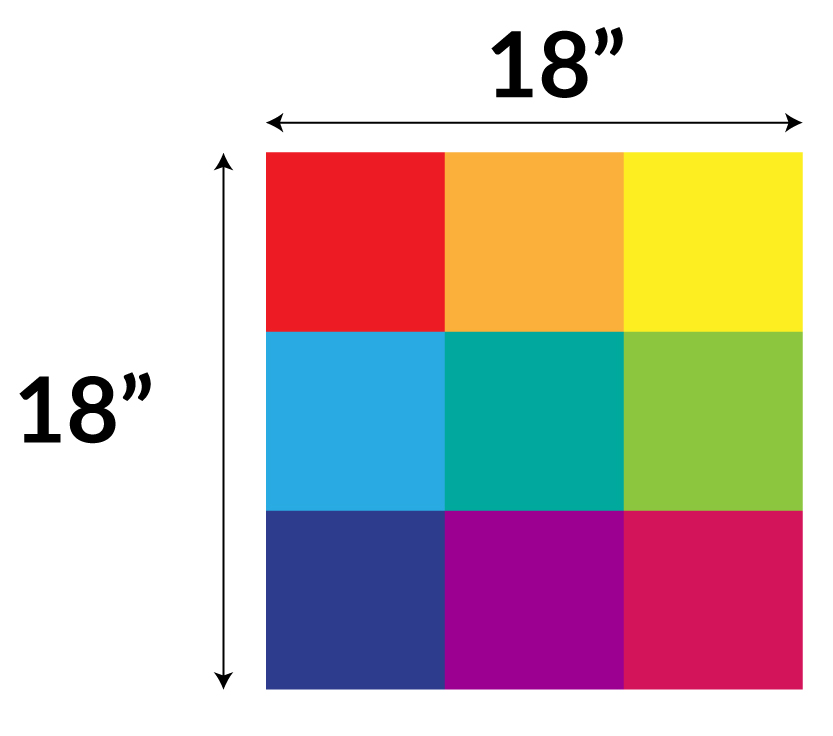
- With right sides together, sew the backing fabric onto the squares, leaving a gap of 2" to turn through. Machine or slip stitch closed.
DONATE SOME TO A CHARITY
These fidget mats can also be donated to charity. If you want to contribute to a great cause, the charities listed below accept handmade fidget mats. Just send your creations in to the mailing address provided.
Are you a charity that would accept this item? Contact us to have your details added here.
Queensland
Dementia Australia
View locations throughout Queensland →
OzCare
Address:
66 River Terrace
Kangaroo Point QLD 4169
Australia
NSW
Dementia Australia
View locations throughout New South Wales →
VIC
Dementia Australia
View locations throughout
Victoria →
ACT
Dementia Australia
View locations throughout the Australian Capital Territory →
SA
Dementia Australia
View locations throughout South Australia →
NT
Dementia Australia
View locations throughout the Northern Territory →
TAS
Dementia Australia
View locations throughout
Tasmania →
WA
Dementia Australia
View locations throughout Western Australia →
Free Embroidery Designs
We're excited to offer our free Echidna designs available for download. These free designs are perfect for those at a beginner or an advanced level. Add these designs to your stash and create incredible embroidery!
View all free designs >
Sewing, Quilting and Embroidery Machines
Interested in learning how to sew, quilt or embroider? Take a look at the innovative Brother machines available for purchase at Echidna Sewing. Wherever possible we will beat any deal and you will always receive ongoing service and support!
Find out more >
Learn to Sew or Embroider with Echidna Sewing
Come along to our fun-filled classes to learn more about sewing, embroidery and crafting. Classes cater for all skill levels, whether you're just starting out or already have advanced knowledge.
Find out more >
Echidna project material/ fabric requirements are an indication only and can seem to be generous. This has been intentional. Should you make a cutting or embroidery mistake you will have sufficient fabric to rectify your error.

